

How To Bulk Rename Files Easy
Edit a large number of files at once with TreeSize.


Unique file names play an important role in professional data organisation. Relevant files need names that are easy for everyone to understand and find. In a best-case scenario, they follow a specific naming procedure. In reality, however, things change. Procedures change and what was once best practice just does not cut it anymore.
As a result, you don’t have to just rename a few files, but sometimes dozens, hundreds, or even thousands. A process that, done manually, could take days and can never be reliable nor economic.
That's where TreeSize comes in: Bulk rename files according to your own criteria with just a few clicks. We'll show you how.
Show transcription
[On Screen: Intro: the TreeSize Professional logo over an image of a hard disk, with the tagline “Bulk rename files easily and efficiently”.]
Rename a whole bunch of files at once with the Bulk Rename feature of TreeSize Professional. In everyday business, it can happen again and again that several files need to be renamed. Especially when it's not just a few documents but dozens, this simple task can suddenly take a lot of time. With TreeSize's Bulk Rename feature, you can complete this task in no time.
[On Screen: TreeSize Professional in the Details view; the files to be renamed are selected in the list via checkboxes.]
First, use TreeSize to scan the drive, or even the specific directory, that contains the files you want to rename. Select the files, either by checkbox or with the Shift + mouse-click shortcut, and then choose the Bulk Rename option under the Details tab.
[On Screen: The “Bulk Rename” dialog (“Rename multiple elements at once”) with a list of available rules and a Configuration area (rule types such as Replace, Delete, Insert and Number), plus a live preview of the new names.]
TreeSize gives you the most important rules directly to choose from. Do you want to find and replace text? Paste text? Number files, or delete text in the file name? Set as many rules as you need for your task.
[On Screen: On-screen note that more and more companies move their file systems to Microsoft SharePoint, where file names must not contain certain special characters (such as # % - & * ? { } : < > / |).]
Here's a popular use case. More and more companies are moving their file systems to Microsoft SharePoint. To do this, all files to be moved must be prepared. For example, files must not contain certain special characters like the percent sign. Large file systems can contain thousands of files that violate this rule. Renaming them manually would take an extremely long time.
[On Screen: The TreeSize Advanced file search with a search rule “Name matches regular expression”, using a regex for the forbidden characters to find and select the matching files.]
First, use the TreeSize file search with this regular expression to search for files with the corresponding special characters and select them.
[On Screen: In the Bulk Rename dialog, a “Replace (regular expression)” rule is configured with the same regex and an empty replacement (or an underscore); the preview on the right shows the cleaned-up new names.]
In the Bulk Rename, select Replace as the rule type and use the regular expression again. In the “Replace with” field, specify an underscore or an empty string. After adding the rule, check your job in the preview on the right side of the screen. Finally, just click Run, and your files are ready to be moved.
[On Screen: Closing screen with the JAM Software logo.]
Bulk rename files with TreeSize
First, you select the files you would like to rename, either via the scan or the search function. Then, you simply enter your rules for the Bulk Renaming and you are good to go.
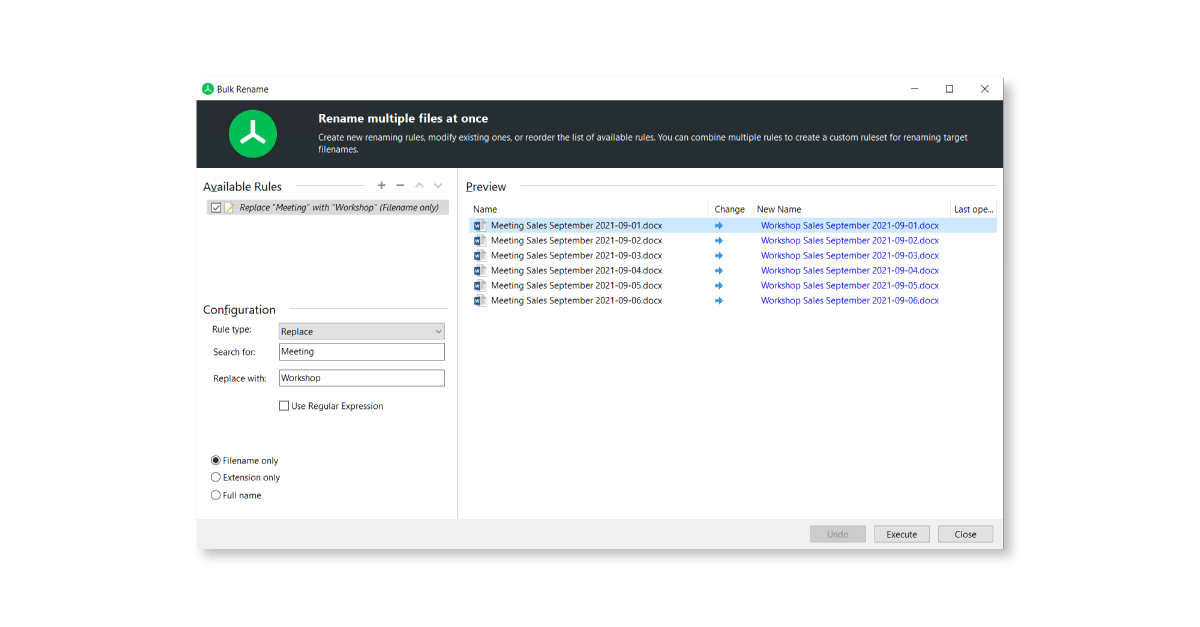
Would you like to find and replace a part of your file names? Just enter digits, words or word combinations that you would like to replace. It is also possible to add new elements to file names, for example prefixes or suffixes to add additional information. Additionally, you can easily number selected documents or delete a part of their file names. Those rules can also simply be combined as you need them.
Delete special characters
SharePoint offers plenty of new possibilities for your business working collaboratively. However, you also need some preparation for a smooth SharePoint migration.
SharePoint, for example, prefers files without certain characters in the file name: #%~&*?{}:<>/|. Manually combing your data system for file names with special characters would be exhausting. With TreeSize however, this is child’s play.
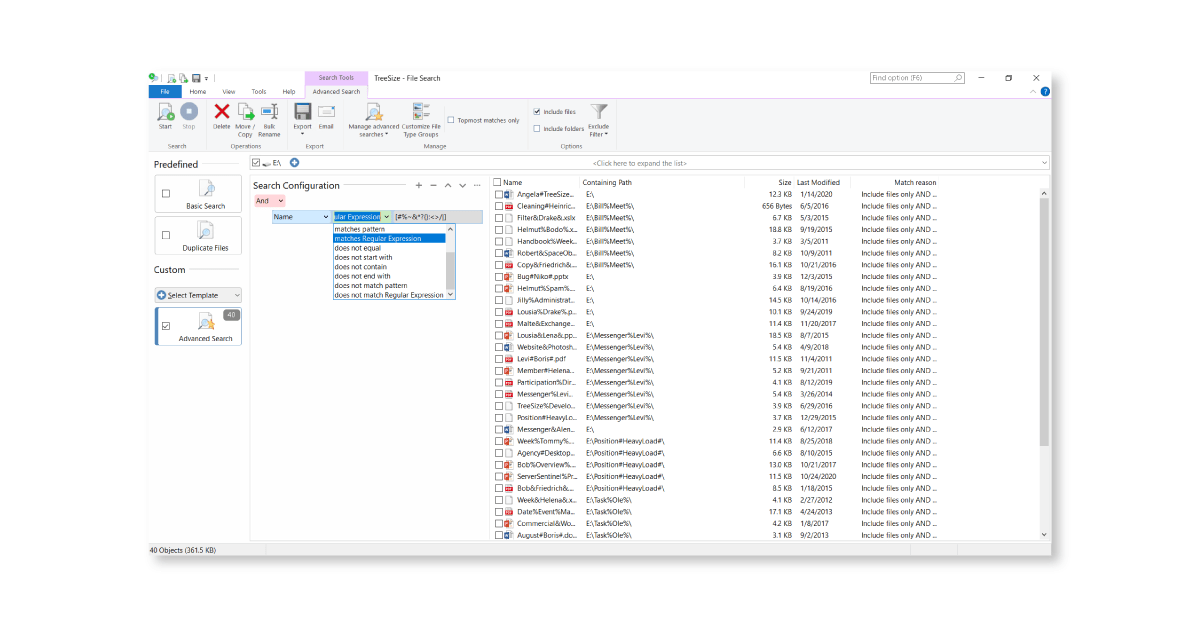
For faster results, we recommend using Regular Expressions. Just open the Advanced Search function, select the drive or folder, then choose “Name" and “matches Regular Expression” and enter [#%~&*?{}:<>/|] in the grey field, searching for all the characters with the bracket. With one click on “Start” TreeSize starts looking for all the file names with one or more of those characters immediately.
With the top checkbox or in the menu, you can mark all found files. You can then open Bulk Rename. Please make sure there are no rules that you do not wish in “Available Rules” and select “Replace”. Select “Use Regular Expression” and copy the special characters you searched for earlier on in the “Search for” box.
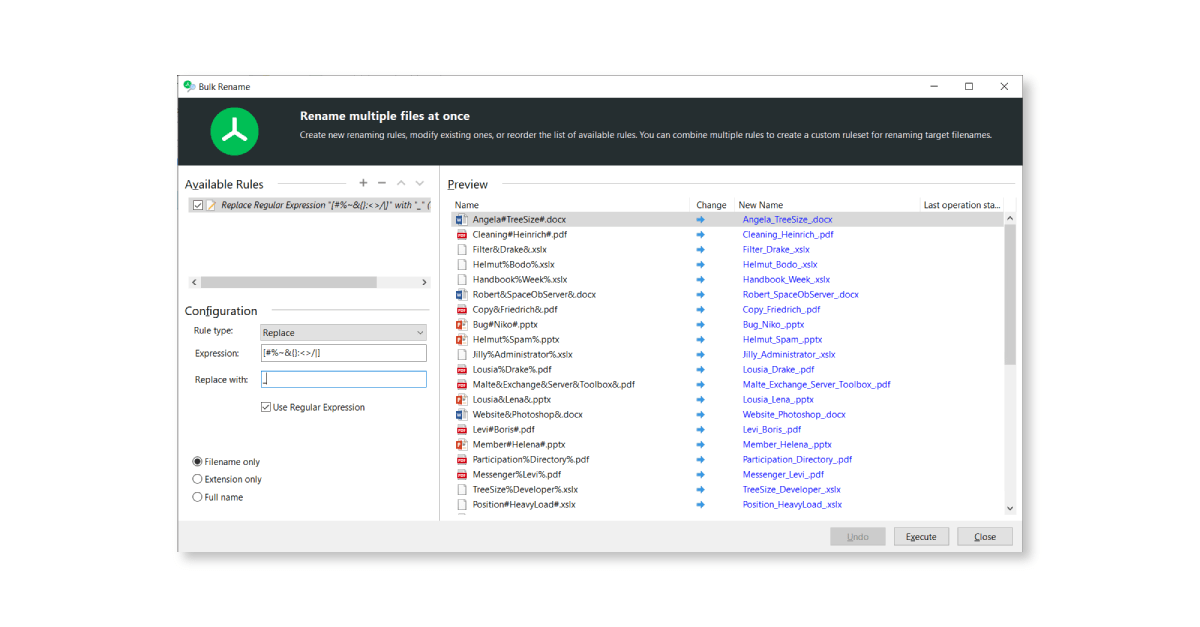
You can then enter an underscore or a blank in the “Replace with” box to replace the invalid special characters. After double checking that everything is in order, you can now go ahead and rename the files in bulk. Invalid file names will now not be an issue anymore when migrating to SharePoint.
Let's sum up
If your job is to migrate your data to SharePoint or another platform and you need to rename files because of naming restrictions on the new plattform: Use TreeSize to simplify the process:
- Use the Advanced Search function to find all file names with a Regular Expression (e.g. [#%~&*?{}:<>/|]).
- Click on “Home”, “Select All” to select all found files.
- Click on “Home”, “File Operations”, “Bulk Rename”
- Select “Replace”, “Use Regular Expression”" and choose how you would like to replace the unwanted special characters via the “Replace With” box.
- Click on “Add Rule” and double check the preview on the right side.
You may now press “Execute”. Now, your files are ready to be transferred to your SharePoint server.
What else can TreeSize do for you?
TreeSize Professional offers a broad variety of different features for your professional File & Disk Space Management.
Want to always stay up to date? Subscribe to our newsletter now!
Do you like what you've just read, have new ideas or feedback? Visit our contact form and let us know your thoughts!